
| Projects Produced By "Studio801"(Since 1982) |
| Since 1982 many items have been designed and built, dissembled and restored, or collected and assembled into a body of work that anyone would except responsibility for doing. Studio 801 is a place that has been built over a long period of time and was a concept that was thought necessary after graduation from the Washington University School of Fine Arts in 1978. Simply stated, "An Artist must have a place to work." This page is dedicated to projects that the studio has been involved in finishing and sending on their way. |
| Stained Glass Projects (New construction) |
|
|
|
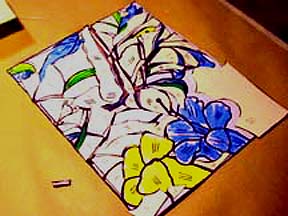
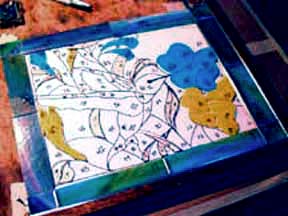
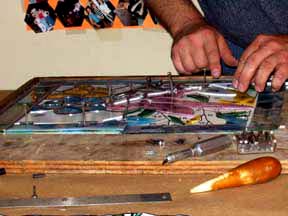
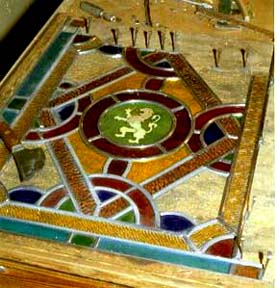
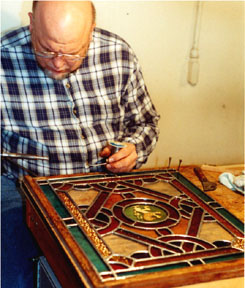
In these images of a recent glass assembly (2004), you can view some of the processes in the window panel making. (Photo 1.) Once a design is agreed to, a cartoon is drawn and it is transferred to a pattern sheet. Both cartoon and pattern parts are numbering alike. The pattern is cut apart removing enough pattern material to allow for the "Lead Came." (Photo 2.) Each piece of colored glass is cut to the size of one of the pattern pieces, keeping in mind the color and visual direction of the glass. (Photo 3.) The finished glass pieces are set on the cartoon in a squared frame. At this point "Came" (lead) is cut to size and wrapped around the finished glass parts. |
 |
 |
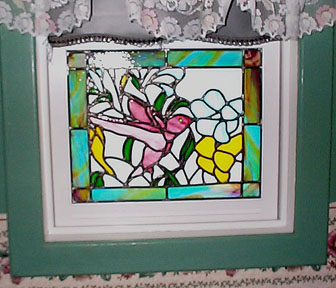 |
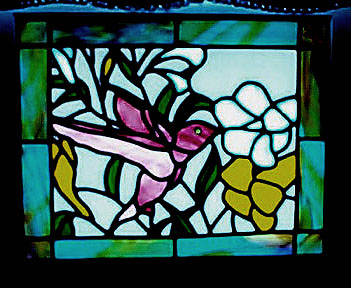
| (Photo 4.)The "Lead Came" which is used to hold the different pieces of glass together is held in place using nails so it can be adjusted during assembly. After the window is totally assembled and checked for being square, it is soldered together at the seams of lead. (Photo 5.) Shows the back-lit is the finished window. (Photo 6.) Lit from the front, the window can be seen in the wood frame of the bathroom window, where it was designed to fit. |
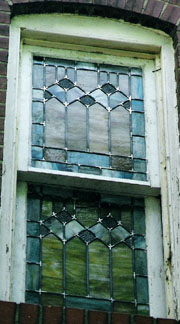
| This window was also a new window construction performed in the studio. It was built for a client in the early 1990s and was designed to fit in a door transom window frame. The window was 18" tall by 36" wide, having 45 pieces of cut opalescent glass. |  |
| Repair / Re-leading |
| These three images show a vintage cut glass window that was restored at the Studio. The damaged window was found by a house painter. The glass panel was bowed outward and was about to loose several pieces of glass. The two panels were removed from the frame and re-leaded. After which they were soldered and sealed It were re-set into the wood frame, which had been re-painted by the house painter. When the project was finished, He took it to his job site and re-placed it in the building for his client. |  |
 |
 |
Window as found pushed
out |
Detail of project |
Finished window replaced
in the frame |
| Another Rebuild |
 |
(Left.) This image shows the Lead "Came" which is used to hold the different pieces of glass together being held in place using horse shoe nails. This method is used so the panel can be adjusted during assembly. (Right.) After the window is assembled and checked for being square, a flux is scrubbed into the lead joints and the panel is soldered together. The final step is to seal the window using a semi liquid old-fasion puddy. |
 |
| New & Old (A Combination Project) |
 |
 |
|
 |
| Glass Project (Three Dimensional ) |
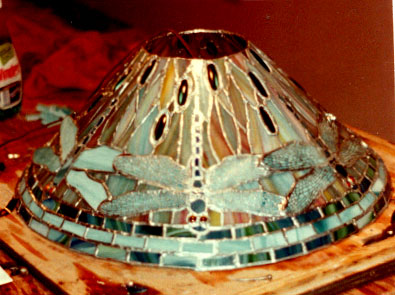 |
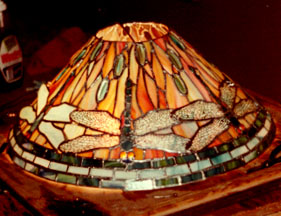
Studio glass projects are
not exclusively flat. These two photographs show a reproduction Tiffany
style "Dragon Fly" lamp shade under construction. One image
shows the shade surface during the application of the filigree prior to
finished soldering. The other offers a glimpse of the shades warmth when
light is placed under it. |
 |
 |
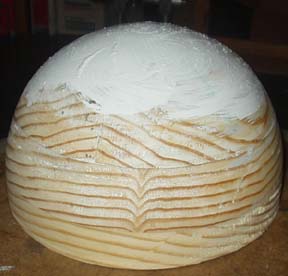 |
In order to make this cut glass shade, it was necessary to make a wooden form turned out of yellow pine. After it was sanded and covered with Gesso, the design was drawn onto the form to develop a repeat. Once established the lamp design was transfered on to a flat cartoon to aid in the glass piece organization. |  |
| (seen in the cartoon on the bottom of this image.) Enough glass in different colors was cut to make the three panel repeat. The pieces were wrapped in coper foil and the lamp was assembled. | 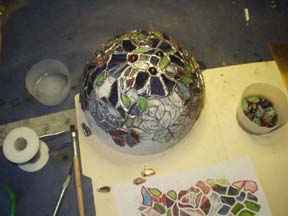 |
Once assembled by lightly tack soldering, this tinned copper foil was finish soldered for strength. Finely, a formed brass ring was added to the bottom of the shade for mounting it on to the bronze lamp base. | 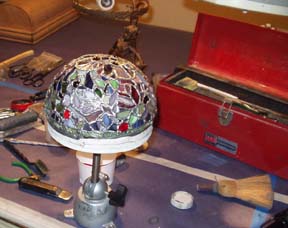 |
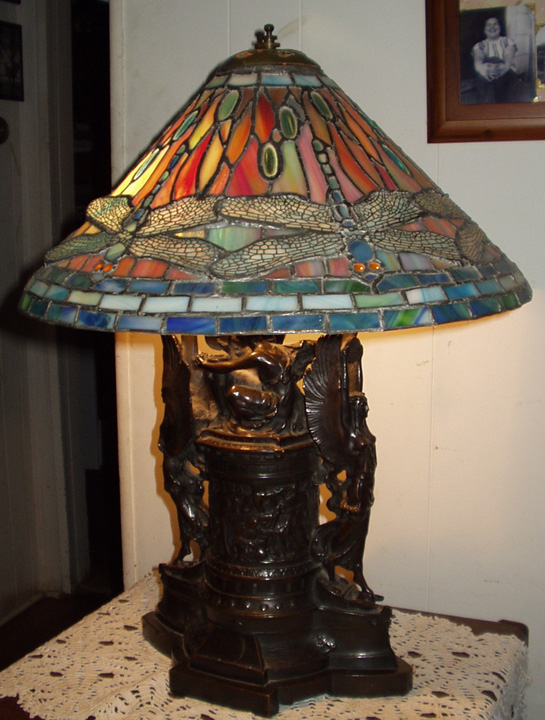
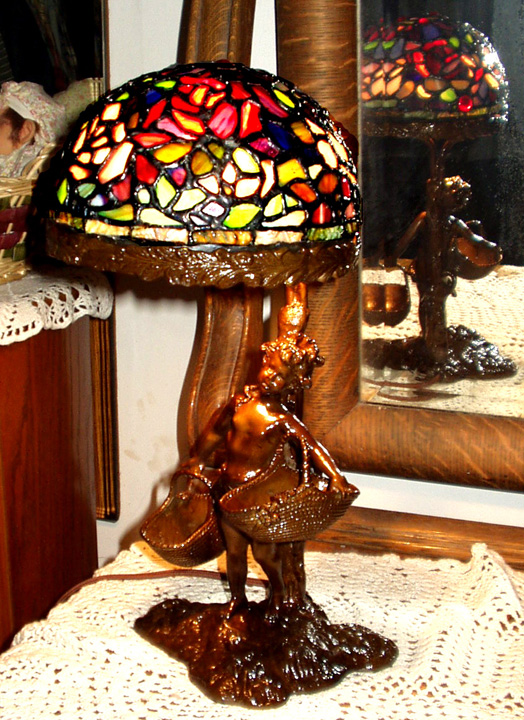
The final lamp design can be seen mounted on this wonderful Bronze flower girl lamp marked on the base, "S. Kestner."
Click the image to enlarge |
 |
| Wood Working |
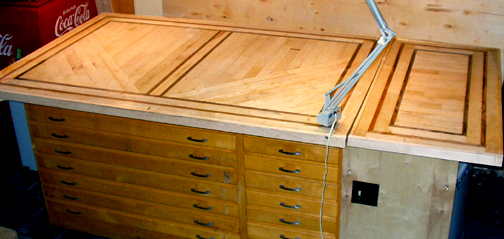
| Custom Built Table Top For the Studio |
This custom built table top was assembled for use in the studio. It is 4 X 8 ft. in size and was based on a sheet of 3/4" plywood. The field wood used is Hard Maple for durability and it was boardered by lines of Black Walnut on the inner boxes and an outer frame of Brazilian Cherry. In order to cover the end grain of the plywood and to match the top, the edge of the top was covered by cut maple. The last detail was to silver solder and install brass eccussions in each corner to hold magnifying desk lights. In order to seal the wood from stains it was sanded and coated with a epoxy hardwood floor sealer. |
 |
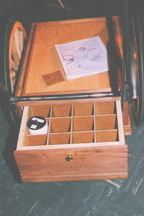
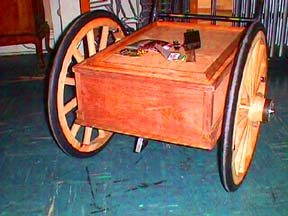
| Wooden Monkey Organ Cart (Custom Built) |
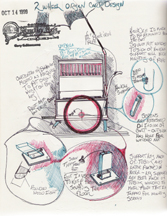 |
Many Studio projects start
in notebooks. This allow the client to see how a given ideas or design
will fulfill their needs. 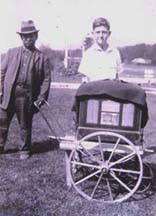 |
 |
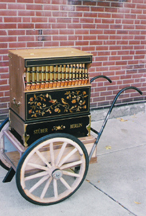 |
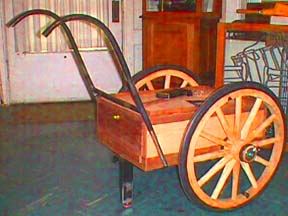
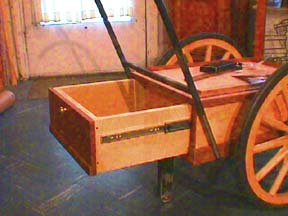
The vintage photograph above center, (from the studio collection,) inspired this custom organ cart built for a fellow St. Louisan, Gary Craig. Gary is an "Organ Grinder For Hire" in St. Louis. He wanted a proper cart to help him in his work. His requirement included: A storage compartment for things he might need to carry, A drawer for his many different music rolls, Convertibility for ease of transportation to and from job and rally sites and A handle at a comfortable height for moving his finely inlayed instrument. |
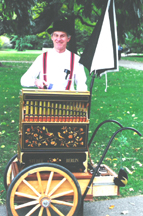 |
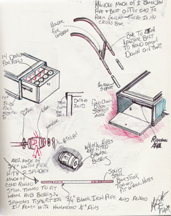
The images below, show several of
the features designed into Gary's Custom Organ Cart. |
 |
 |
 |
 |
 |
 |
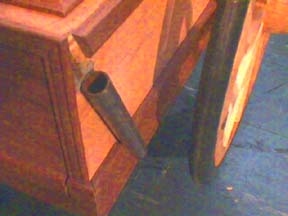
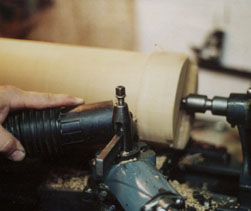
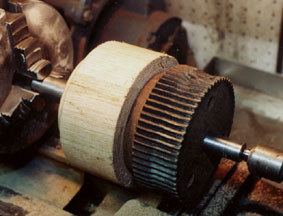
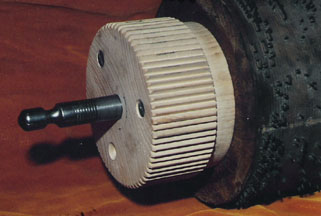
| Barrel Organ Replacement Gears |
 |
This series of images offer a glimpse into the making of a monkey organ barrel gear. A series of Ash wood planks are glued together. They are then turned in a lathe to make them into a cylindrical shape. This small pillar of wood is then sliced into several, over sized, gear blanks. A special mandrel is made for each application so an exact copy of the gear can be reproduced. The last photo shows a new barrel gear in place on a vintage organ barrel. |
 |
 |
 |
|
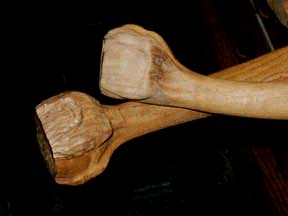
| Ball & Claw Feet (Studio Carved) |
 |
 |
 |
In the restoration of these walnut table legs, walnut blocks were glued to antique claw foot table legs When dried these blocks were hand carved and sanded to their final form. The legs were stained to blend them with the original leg walnut and they were varnished as a finish. |
| Carpenter's Lace |
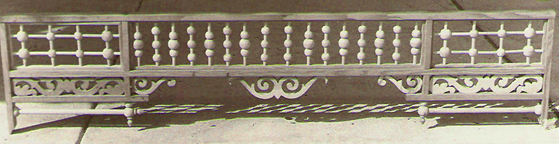 |
| Carpenter Lace was built in the studio for a local client, who was restoring a victorian and wanted to have this made to be placed between his living-room and entrance foyer. This piece was made on a frame of 1-1/4" fir and various sizes of poplar wood balls and dowels. The designs were cut on a jig saw from a plank of 3/4" pine. |
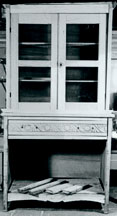
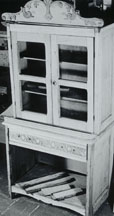
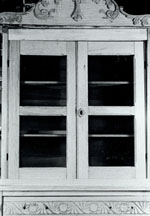
| China Cabinet Restoration (Kids Stuff) |
 |
 |
 |
 |
 |
The only difference between restoring "child size" furniture and a "full sized" piece, is the size of the wood parts, all parts and joints take the same amount of time to reproduce. This, four foot tall, oak china cabinet was restored in the studio in the mid 90s. It was a family piece that had been bought "used" for the current owners mother and aunt, in the early 1940s, It was passed down through three people and two generations. Restoration was undertaken to pay honor to the owners mother who was the first in the family member to possess it and to, in time, pass it to the next generation. Case as seen in the first image was totally apart when it was brought to the studio, having just been stripped. When re-assembled prior to restoration it was found only four of the 10 parts of the two bottom doors were with the parts when delivered. One of the doors was partially there, the other door was never on the cabinet when it was gotten from the owners aunt. In all of the time the current owner had it, the bottom was always covered with a curtain. Fully restored, it proudly sits in the entrance way of their home for all to see. The detail pieces carved in the bottom doors centers were made following the pattern of the top carving in the center. |
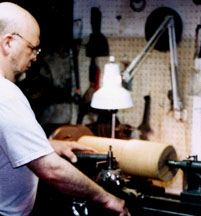
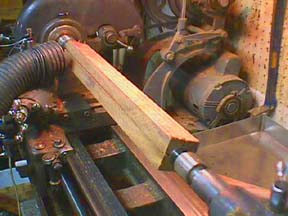
| Custom Wood Turning |
 |
 |
 |
 |
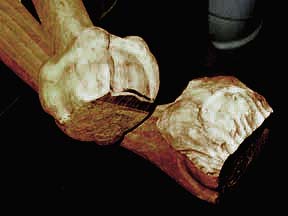
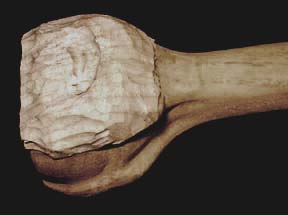
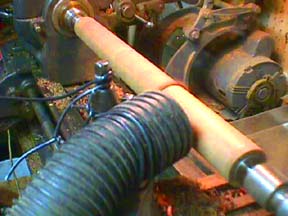
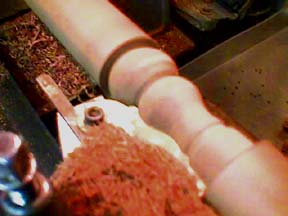
| This series of images show the turning of cross-leg stretcher parts for a custom designed Monkey Organ stand. The part shown here were made using a custom plunge cutter and personally ground cutter bit made from an old planer blade. To make the parts, four square cut 3/4" strips of walnut were glued together. The glued-up lumber was then made round before the cutter is plunged into the fast turning dowel. The part is removed from the lathe and rotated before being "plunge cut" again. |
| Studio Made Products |
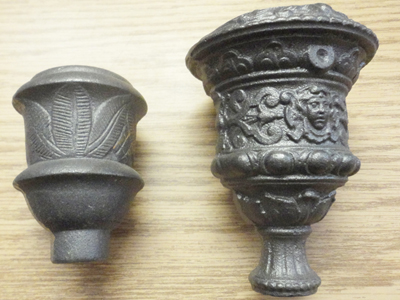
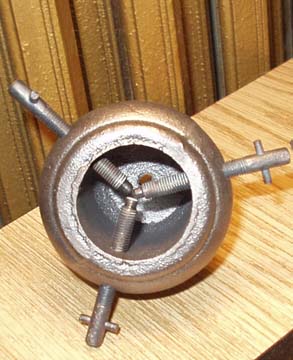
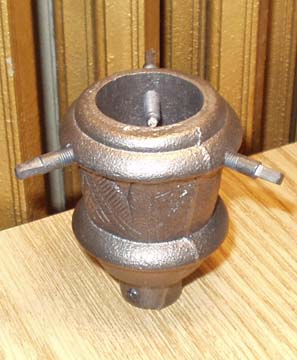
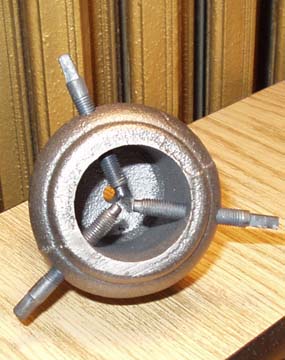
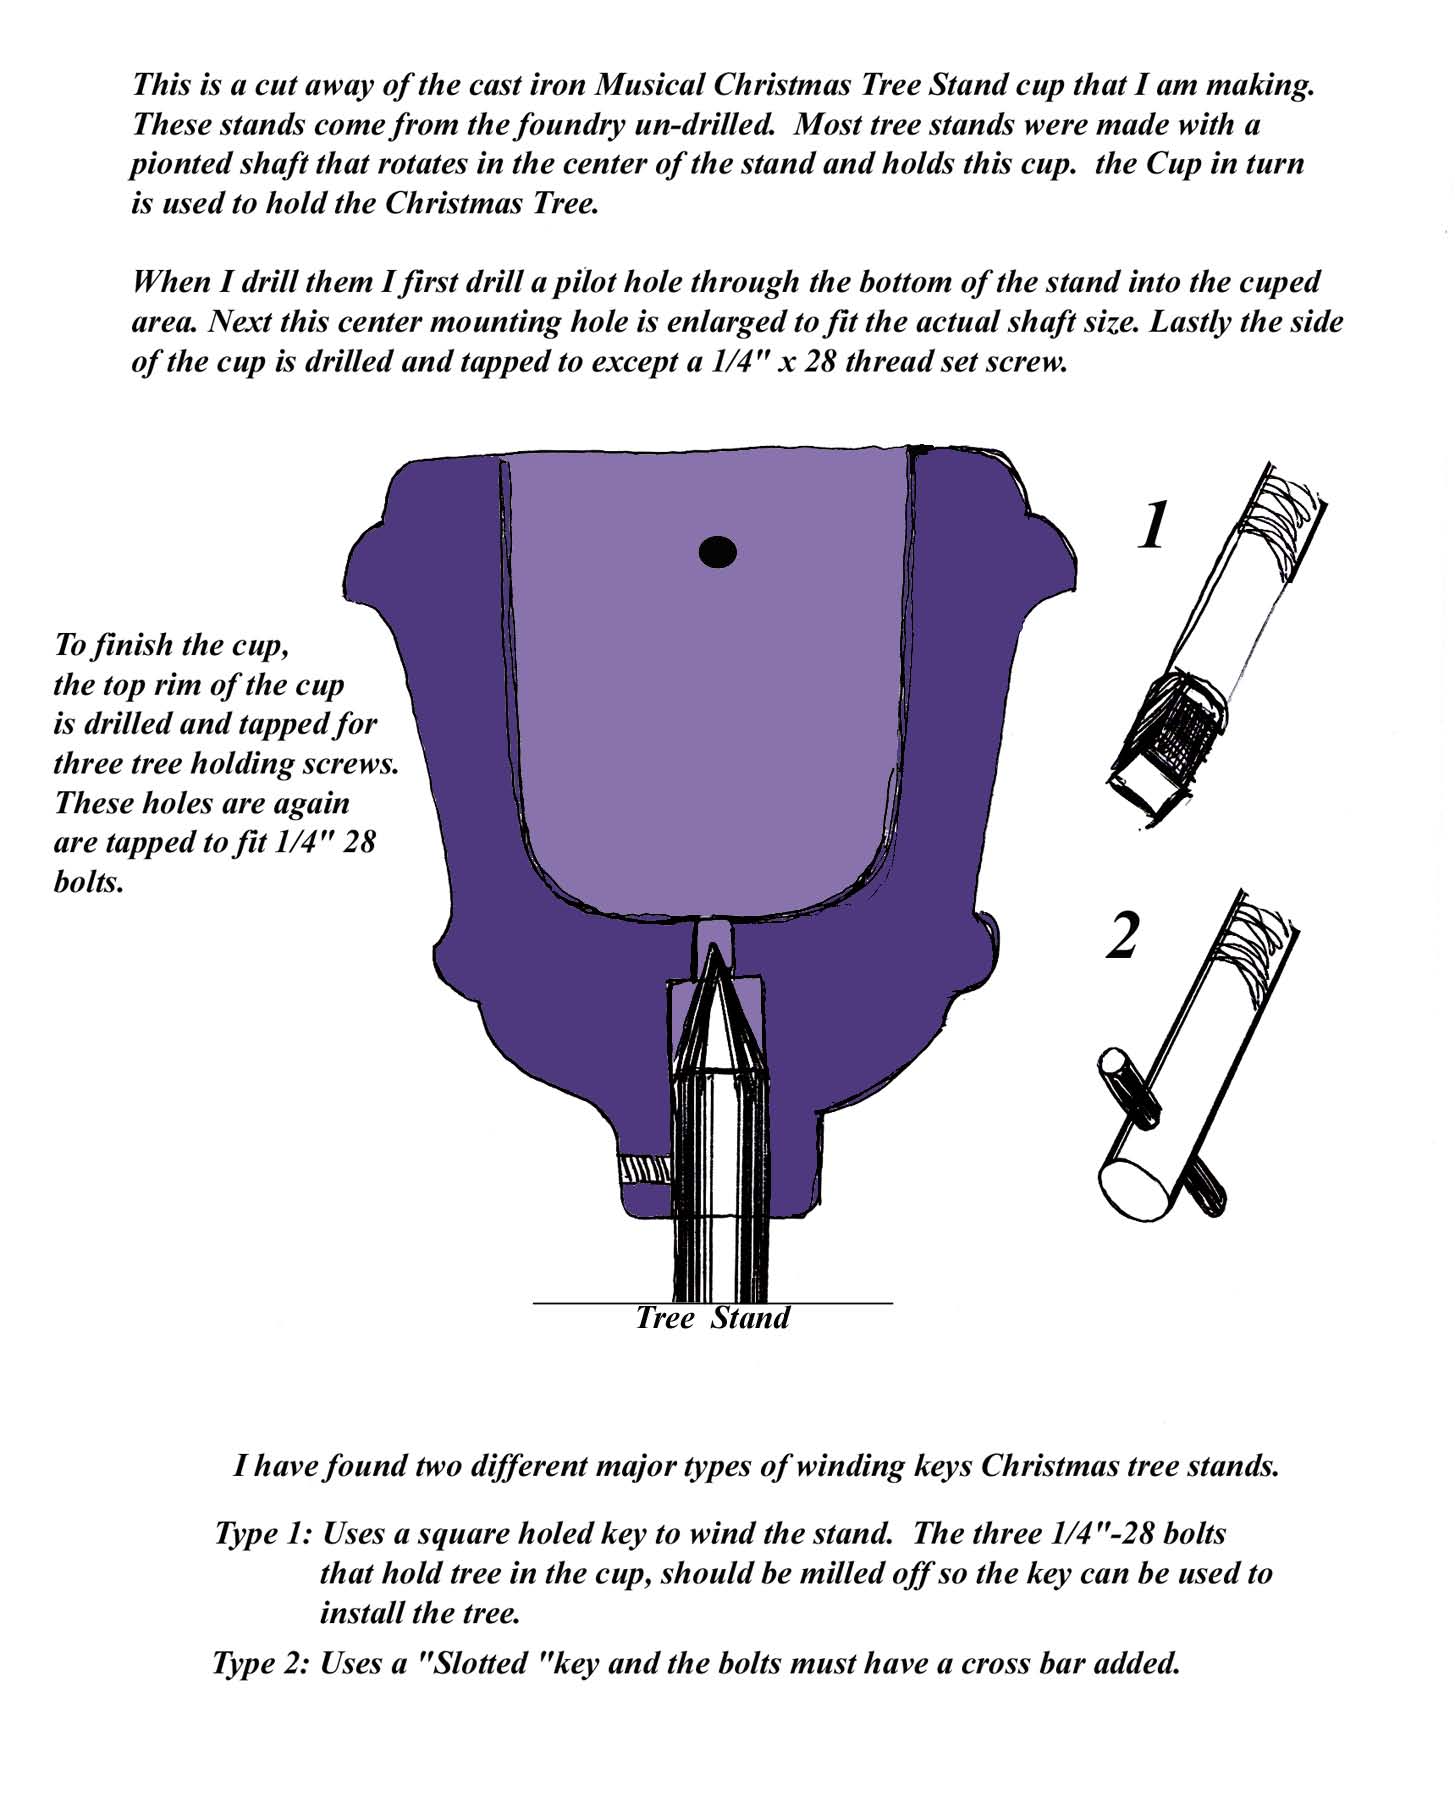
| Cast Iron Christmas Tree Cup |
 |
 |
These cast iron cups were
made as replacements, for the often missing "Tree Cup," on antique
Musical Christmas Tree stands.As you can see, the final step is fitting
the new cast iron cup to the many styles of Musical Christmas Tree Stand.
|
 |
 |
 |
 |
This tree cup was machined for a tree stand with a "T" type winding key. |
While this tree cup was machined for tree stand with a "Square " type winding key. |
I have a new batch of these castings made and each are for sale at $ 135.00 USD
|
|
Since the initial production of these replacement "Tree Cups." I have been able to reproduce another style of these necessary parts of the Christmas Tree Stand. Unlike the cups I have been making, this cup was taken |
directly from an originial very detailed stand cup. So it is important to note that not every detail transfered 100% and they do very from cup to cup. These cups have a cast taper in their bottom and a hollow in the top for the tree |
These larger more detailed castings are for sale at $ 160.00 USD each
|
 |
This link has been provided with details the Studio will need to make a custom tree cup for you. | LINKS |
I have also provided a link to take you to a page with more information on custom Studio made cups and Musical Christmas Tree Stands. | |
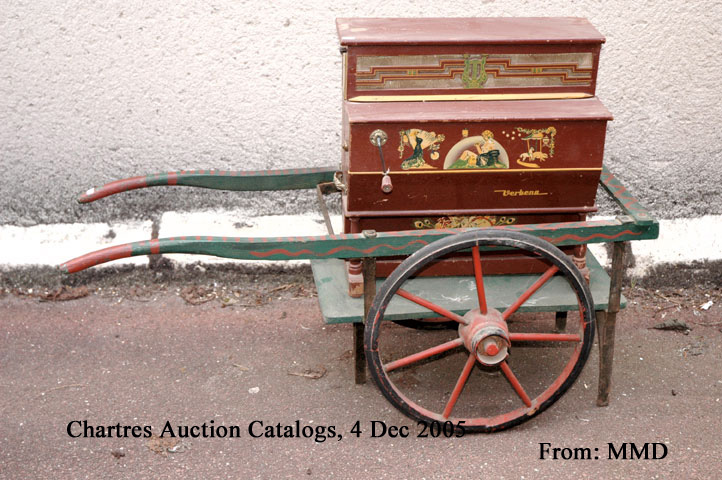
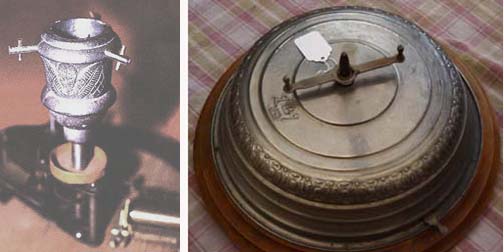
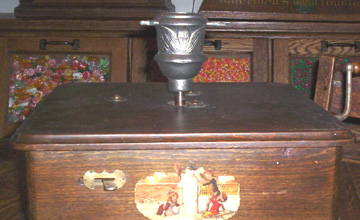
| Snail Cam for the VERBENA by REIG |
|
|
Several years ago repaired a small contemporary barrel piano. The unit had two markings silk-screen printed on it: The first was on the front of the case and said | 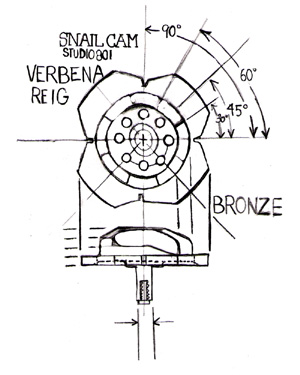 |
|
|
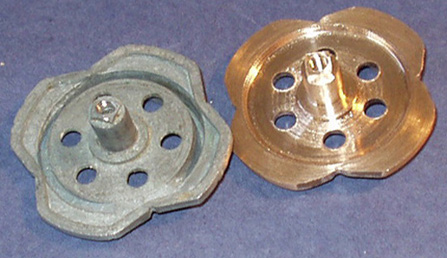
"VERBENA"; The second, "REIG" and was printed in the same yellow color on the round barrel door. The barrel door also had the words "PATENADO", "MADE IN SPAIN" & "MUSIC BY REIG." This small but nicely made toy, painted a slick maroon, was screen printed with 4 pictures on it's front. It also had a stylized yellow note and line boarder design on it's case. Glued onto the back of the piano was an instruction sheet marked #728 or #72B. In order to repair this piano, I had to remake the pot-metal barrel shifting cam, that was in pieces in the bottom of the piano case. Judging from what this cam was made of and how bad this part was when I started, I believe others may need this same part. |
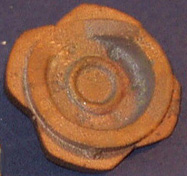 |
In these two images show the rough bronze casting as it was gotten from the foundry. You can see the general shape of the needed part. | 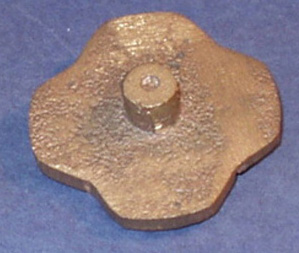 |
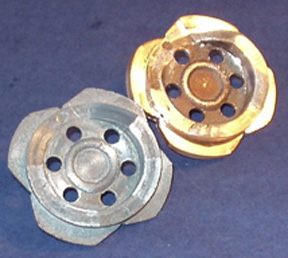 |
These final two photos show an orginial VERBENA snail cam, (later found,) setting next to the machined casting I made to replace the broken cam. I still have a few of these castings for sale at $125.00 USD (post paid with in the United States.) |
|
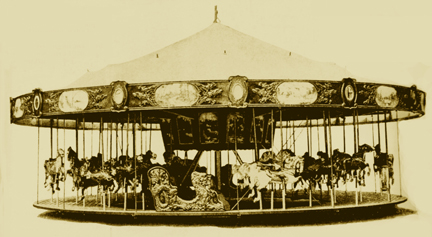
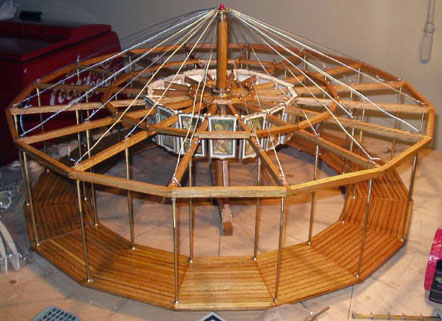
Studio801 Carousel Project |
(underconstruction)
Started - 2001 |
 |
 |
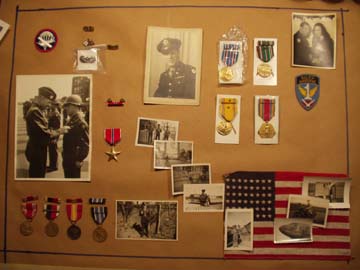
| WW-II Memorial (A Shadow Box) |
 |
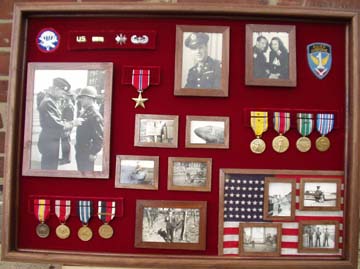 |
This Memorial shadow box was designed and built for Lieutenant Xxxx Xxxx, a Glider Pilot Who earned the Bronze Star (seen being decorated by General Omar Bradley) for his part in the World War II - D-Day Invasion. The finished piece was made of walnut and was covered with UV glass to protect the contents from light. To start, the client knew he wanted to have a memorial to his father, who had served his country with honor in WW-II. He also knew he wanted it about 20"x 30". The rest was in the air. The items for memorial were gathered together and then loosely arranged to get a sense of the space and items involved. They were then moved and adjusted to develop an over all look. |
| Studio Restorations, From The GroundUp! |
|
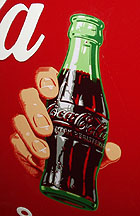
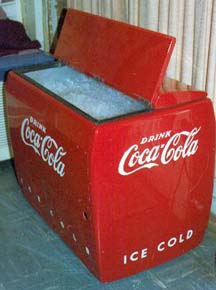
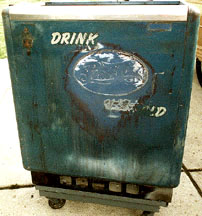
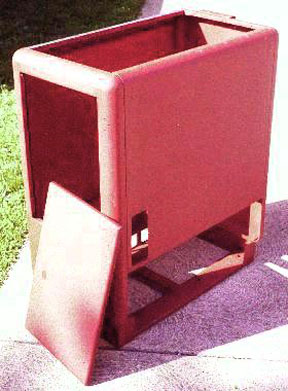
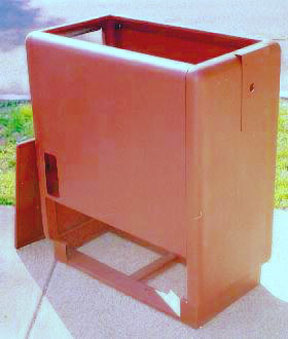
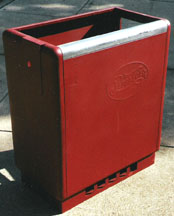
| Coca-Cola (Resurrected From A Landfill) |
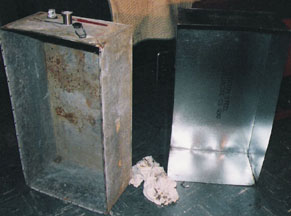 |
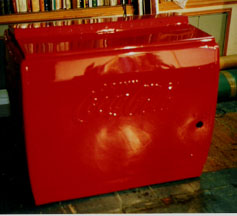 |
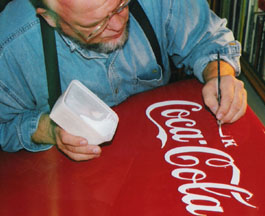 |
This Coca-Cola "Ice
type" soda cooler, was removed from a land fill and was restored
at the Studio. After the box was taken apart, the parts were assessed
for damage. A new galvanized inside liner was deemed necessary and was
fabricated. The seams of the new box were then soldered together at the
corners to make them water tight. A new bronze drain plug assembly was
machined and soldered into the liner making it water tight as well. While
this liner was being made, The outer box was sent out to be sand blasted.
When it was returned, all rust holes that were opened during blasting
were welded closed and sculpted to the contours of the case. Afterward
the cooler was painted Coca-Cola red, allowed to dry and finely buffed.
New insulation and the liner box were re-installed then the rubber door
seal was put in place. To finish the restoration, the cooler was hand
lettered in white. Vintage Coke decals were later found to dress the box
further, (See center inset below.) |
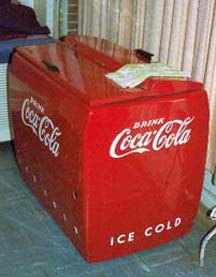 |
The finished Coca-Cola box was filled with ice and soda for a Christmas gathering, the 6 cases of canned soda placed in it stayed cool for 6 days. |
 |
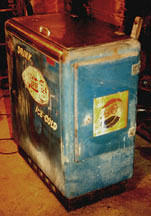
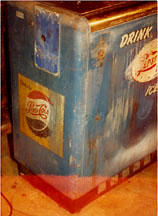
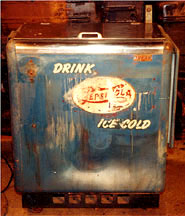
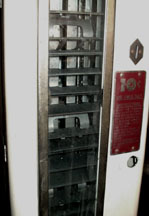
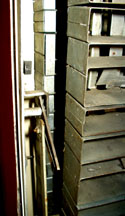
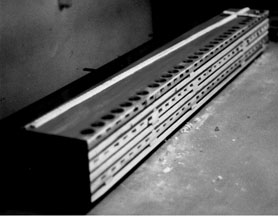
| Pepsi-Cola (in process of Restoration) |
 |
 |
 |
 |
| One of the current total restoration at the Studio is this 1953 "Ideal 51-Slider," soda machine. It came out of a body shop and its stainless top looks as though it was used many times as an anvil, it was dimpled all over. It also looked as as though it was also used to test paint guns as well, there were many places with different color paint. Note the vintage decals, because of the paint surface damage, none of them could be saved. Tracings were made so silk screens can be produced at a later date to re-install them. |
 |
 |
 |
 |
| Like The Coca-Cola box restoration, this box was also dismantled and was sand blasted to remove all of the badly chipped and discolored paint. The inside liner was badly rusted and was replaced. Lucky for me, there was an area under the coin box that had not seen the light of day, so that area was sampled to get the paint color formula. Like the Coke box had done, this box is on its way back from the dead. |
| . |
| Penny Gum Machine (On a new base) |
This restoration is actually not about the "actual" gum machine but the marriage between the machine and the cast iron table base. The machine was well preserved but always supported a breakage worry. These coin-op's were made to be securely fastened to a stand or a store counter and were also made to hold up to years of service. Because this unit was not fastened to anything, it was a hazard. When the kids put a penny in the machine and started turning the handle the machine always tried to turn over. This cast iron table base was located at a local Flea Market. It was found very rusty and could not be easily be taken apart. It was first wire brushed to remove the loose rust. Then it was heat treated |
 |
| with a torch to burn the remaining loose rust out of the many details that were cast into it. The 3/16 inch thick plate, that once held the wooden table top had to be cut to fit the bottom of the machine. The stand was then painted flat black to enhance it' look. When dry, the finished mounting plate was drilled and taped for machine mounting bolts. in order to enhance the finished look of the machine it was attached to the restored base from the inside of the machine. |
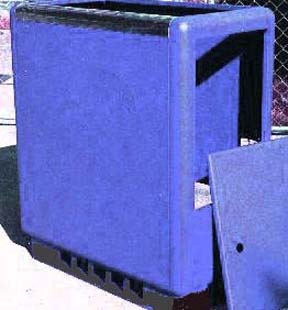
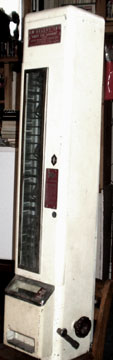
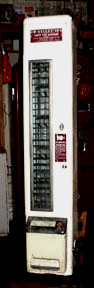
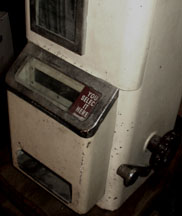
| Candy Bar Machine (Another Restoration in Process) |
| This "U-Select-It" Candy bar machine was recently brought to the studio for restoration. It has been taken totally apart and is on it's way back to prime condition. | 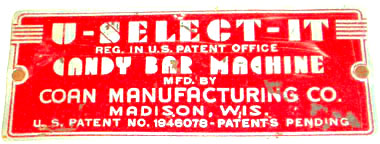 |
 |
 |
 |
 |
 |
 |
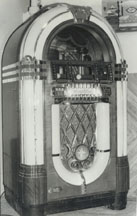
| Wurlitzer 1015 Restoration |
Bubble Wurlitzer, Model 1015
|
This Bubble Wurlitzer, 78 rpm, "model 1015" (ca1940s)was restored at the studio in the 1980s. The wood case parts were stripped and refinished. All of the small square mirrors on the case sides were replaced. The outer chrome pieces were replated and or polished as necessary and all of the plastics, (which had shrunk and were distorted,) were replaced. The last of the items that make up the outer look of the machine, (the signature bubble tubes,) had to be replaced and all of color tubes were replaced as well. The inner works of the machine were all gone through. This included cleaning contacts which had become dirty from setting. All the drive motors were cleaned and lubricated. This 1015 was then loaded with records and played for weeks testing its performance. When it was felt it was in prime shape it was sent on it's way. |
Studio helper Thomas at the finished "1015"
|
| Player Piano Parts (from Scratch) |
This set of valve or deck boards
were made from scratch for an early 88 note Steinway "AR", Duo-Art,
Reproducing Grand Piano. They were made of aged white poplar and were
constructed using three story poles (two of which are setting on top of
this stack) What's a Story Pole? Story poles have been used throughout history as measuring devices. These "Story Poles" were marked with every dimension necessary to build this assembly. Un-like conventional rulers, story poles have no fractional increments and are used for building a specific item. |
 |
| Machinist Tool Chest |
 |
This un-finished oak tool
case is shown being built as a stationary shop wall mounted machinist
chest. The outer box is an antique made of quarter sawn white oak. When
finished it will have a lockable outer door, 10 finger jointed felt-lined
drawers of various sizes and an upper area of shelves for larger machinist
devices. |
| Lionel Trains (Just for Fun) |
| Some of my favorite memories, were the ones generated through the constructions of the yearly Lionel Train Boards. I first built them with my Father at Christmas time in the late 1950s & early 1960s. Then with my closest friend John Hribar starting in mid 1960s. The first train layout John and I built alone was assembled on a board built by my father at John's house. The layout in this photo was built for my children in the mid 1980s (again at Christmas time) and was assembled for my kids to enjoy. The layout was all linked together through many switch tracks and could | 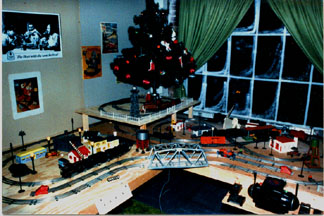 |
| handle running four different trains at one time. I wired many light switches for the kids, so they could flip them on & off. Each switch did something different on the layout. The kids still talk about the Christmas I built put up the trains. |
 |
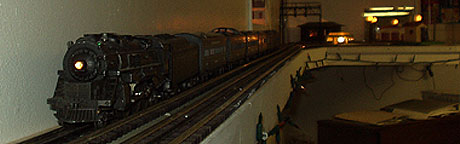 |
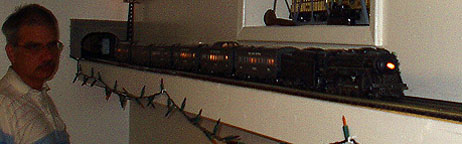
The latest O-27 layout Johns and I built, was assembled in 2003. It is very different from any other we had ever built, in that it sticks out from John's basement wall only six inches. It is simply two tracks at eye level that run the length Johns house. on one end both tracks totally disappears into a wall, (Seen on the left photo, left side.) While in the wall it runs through his wash machine room, turns around in a storage closet, then heads back through the wash machine room again, out of the wall and down the long stretch. The train runs along the wall sixty foot down-line where it turns around on an exposed turn around loop, (seen on the right side of the right image.) It was a fun project, and is very low Maintaince too. |
| Links to Other Project Pages |
 |
 |
Click on the "Band Organ" photos to view images from the building of a street organ and a band organ. |  |
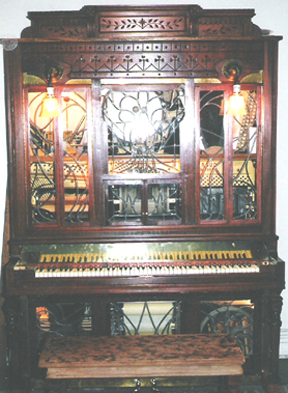
Click on the piano icon to view photos from the total restoration of this "Kieselhorest" player piano. |
 |
Click on the "Orchestrion" Icon to link to view this Studio 801 project. |  |
Click on the "Resume" Icon to link to Gary Stevenson's professional Resume and to many other Studio 801 items |  |
Click on the "Home Page" Icon to return to the "Studio801" home page |
(Revised 3-2018)